

Compute
Custom Templates
Register any registry image as a template so you can rent against your own stack instead of a built-in one.
Prerequisites
Section titled “Prerequisites”- The Manage compute permission (permissions table).
- An image that runs as
rootand starts on its own, pushed to a registry with a pinned tag. - For a private image, a registry username and password or access token.
What a custom template is
Section titled “What a custom template is”A container image plus an optional start command, saved under a name. It appears in step 2 of the deploy wizard alongside the built-ins, marked with a My Template badge — see Deploy a GPU Instance.
Three rules decide whether it works:
- It must run as root. Images whose base drops to a non-root user — the
jovyanandcoderdefaults, for example — break password provisioning. Add aUSER rootlayer before you push. - It must be runnable. Grafilab validates the image on save and rejects one it cannot start (
DOCKER_IMAGE_NOT_RUNNABLE). - Pin the tag. An image that resolves to something different next week makes an instance you cannot reproduce.
There is no port field. Ports are published after launch with Web Access on Manage Instances.
Create one from the wizard
Section titled “Create one from the wizard”-
Open Compute and go to Template Selection in the deploy wizard. Click + to open Create New Template.
-
Fill Name — how the template shows up in your list — and Container Image: “Docker Hub, GHCR, or other registry image in
namespace/image:tagformat — or paste a Docker Hub page link.” -
Leave Registry Credentials on “No credential” for a public image. The field’s help reads “Only needed for private images.”
-
Optionally set Container Start Command: “Optional — leave empty to use the image’s default start command.” For example:
Terminal window bash -c "jupyter lab --ip 0.0.0.0 --port 80 --allow-root"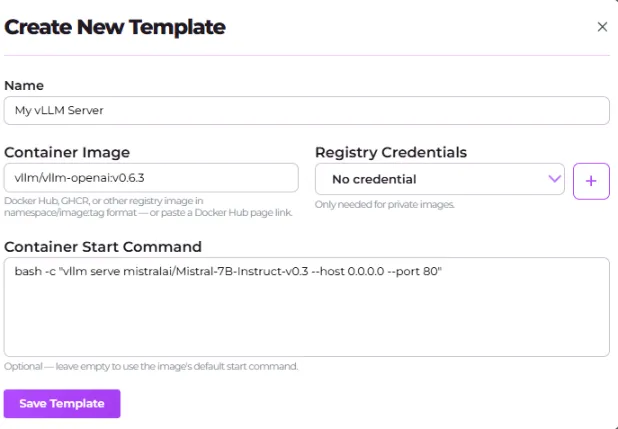
-
Click Save Template. The button shows Validating image… while Grafilab pulls and tests the image, then the template joins your list.
Add registry credentials
Section titled “Add registry credentials”-
In Create New Template, open the Registry Credentials select and choose Create Registry Credential.
-
Fill Credential Name, Username, and Password. Where the registry supports it, use an access token rather than your account password.
-
Click Save. You get “Registry credential is created successful!” and the credential is selected on the template.
Manage on Docker Templates
Section titled “Manage on Docker Templates”The Docker Templates page (/docker-template) is the full list. It has no sidebar entry — reach it by URL, or from the Home dashboard’s Quick Deploy → Docker Template card.
- Add New Template opens the same form as the wizard.
- Each row shows its Path with Edit and Delete actions.
- Edit opens the detail form; Update saves it and Back leaves it.
- Delete asks “Are you sure you want to delete this template? This action cannot be undone.”
Deleting a template removes it from the wizard only.