

Compute
Manage Instances
Everything you do to a running rental happens on My Instance, headed Instances: connect to it, publish a port, extend it, or archive its files. “No results found.” means nothing is running — start with Deploy a GPU Instance.
Prerequisites
Section titled “Prerequisites”- A rental that has finished provisioning, so its card reads Active.
- The Manage compute permission (permissions table).
- An SSH client. Windows 10 and 11 ship one; add the “OpenSSH Client” optional feature if
sshis not found.
Your instance card
Section titled “Your instance card”One card per rental, carrying the actions Connect, Web Access, Renew, and Backup.
- The node — supplier and location, the GPU name and its VRAM, IP Address, CPU model, Cores, Speed, Download and Upload in Mbps, and Disk Space.
- Status — Active or Inactive, a plain on/off reading of the container rather than a lifecycle; a fresh rental flips to Active once provisioning finishes.
- Utilization bars — CPU Utilization, Disk Utilization, and GPU Utilization per GPU index. They read No data until the agent reports metrics, a few minutes after launch.
- Footer — Running grafilab/jupyterlab:2026-06-09 and Expire at 9 Sept 2026, 04:32 am MYT, the moment the rental ends.
Connect over SSH
Section titled “Connect over SSH”-
In the console open My Instance (
https://app.grafilab.ai/orders) and find the card for your instance. Wait until its status reads Active. -
Click Connect. The Connect with SSH dialog shows an SSH Connect command and a Password.
-
Copy the command into a terminal, press Enter, and paste the password when prompted. You land in a root shell inside the container.
The command takes one of two shapes, depending on whether the node is reached through the Grafilab proxy or at its own address:
ssh <your-slug>@<ssh-proxy-host> -p <port># orssh <username>@<ip-address> -p <port>Copy whichever the dialog shows rather than assembling your own; the dialog also has Reset Password and Close. Nothing appears as you type the password — that is expected. You land as root with the GPU attached, and nvidia-smi lists the card straight away.
Reset the password
Section titled “Reset the password”If the password stops working, click Reset Password in the Connect dialog. The confirmation asks “Are you sure you want to proceed with password reset?” and warns “It might take a little while for the changes to be reflected. Thank you for your patience.” Choose Yes; on success you’ll see “Password reset was successful.” Reopen Connect to read the new password.
Copy files in and out
Section titled “Copy files in and out”Use the same port as the SSH command:
# push a dataset to the instancescp -P <port> dataset.zip <your-slug>@<ssh-proxy-host>:/root/
# pull results back, resuming if interruptedrsync -avP -e "ssh -p <port>" <your-slug>@<ssh-proxy-host>:/root/outputs/ ./outputs/
Note the capital -P for scp and the lowercase -p inside the rsync transport string.
When SSH won’t connect
Section titled “When SSH won’t connect”Connection refusedright after launch — the container isn’t up yet. Wait until the card reads Active, then retry.Permission denied— the password was regenerated. Click Reset Password in the Connect dialog, then reopen it to read the new one.- Commands work over SSH but can’t find CUDA or conda — the platform layer exports the image’s own environment into the login shell, but only for
bash. On an image whose interactive shell isn’t bash, source the environment yourself or call binaries by full path.
Reach a web service
Section titled “Reach a web service”Templates with a web UI already answer on port 80 at https://<your-slug>.instance.grafilab.ai. Use Web Access for anything else you start yourself.
The dialog has two tabs, Details and List: “Expose a running service inside your instance to the internet. Each port mapping creates a public proxy URL (e.g. <slug>-<service_name>.instance.grafilab.ai) that routes traffic to the specified port in your container.”
On Details:
- Service Name — “A unique label for this port mapping. Used to generate the proxy URL.” Letters, numbers, and hyphens only;
sshis reserved. Examples from the placeholder:jupyter,api,webui. - Port — “The port your service is listening on inside the container (1–65535).” This is the port your process actually binds, and it must be bound to
0.0.0.0, not127.0.0.1, or the proxy can’t reach it. - Custom Domain (Optional) — “Point your own domain to this service. Set a CNAME record in your DNS pointing to the proxy URL shown in the list.”
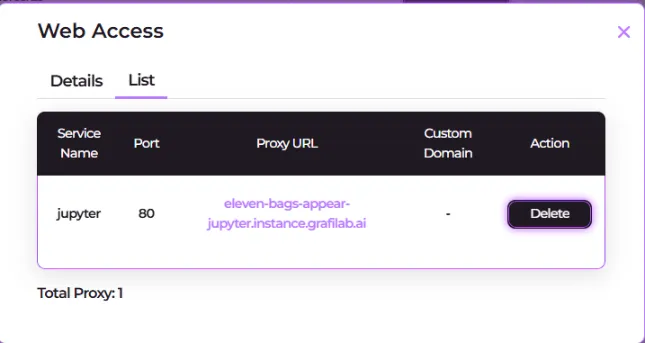
The mapping becomes https://<your-slug>-<service>.instance.grafilab.ai. The List tab shows every mapping — Service Name, Port, Proxy URL, Custom Domain, and an Action column whose Delete removes one row. Total Proxy: at the bottom counts the mappings on this instance.
Custom domain
Section titled “Custom domain”-
In Web Access → Details, save the mapping first, with Service Name, Port, and your hostname in Custom Domain (Optional).
-
Open the List tab and copy the Proxy URL for that row — it is the CNAME target.
-
In your DNS provider, add a CNAME record from your hostname to that proxy URL. Your domain answers once the record propagates.
Anyone with the URL can reach your web UI
The Grafilab proxy does not add a login in front of your instance. Your random three-word slug (https://<your-slug>.instance.grafilab.ai) is the only barrier, and the shipped web templates have no application login of their own (Open WebUI is the exception). Treat the URL like a password: don’t paste it in public places, and if you need a lock, add one inside the app over SSH.
Extend your rental
Section titled “Extend your rental”An instance runs until Expire at and no further. Click Renew before that moment.
-
On the instance card, click Renew. The dialog opens with “You may renew your rent & run before the expiry date.”
-
Choose a duration. The dialog shows the Price per hour for this node so you can see what the extension costs.
-
Pick a Payment method — the card option shows as Visa or Mastercard, and paying from credit shows your Balance:.
-
Click Confirm. You’ll see “Rental renewal was successful. The system is updating your expiry date and it will be visible shortly.”
The new Expire at appears once the payment row settles, which is not always instant — reload after a minute rather than renewing twice. Track the charge on Rentals & Billing History.
What happens at expiry
Section titled “What happens at expiry”At Expire at the container is removed and the node returns to the marketplace. There is no button to halt a rental early and no refund for unused hours — renew to extend, and archive your work before the clock runs out.
Back up your data
Section titled “Back up your data”Backup archives folders from inside the container to Grafilab storage and hands you a .tar download that outlives the rental. Start it well before Expire at.
Nothing persists past the rental
Instances have no persistent volume. Anything you write at runtime — downloaded models, installed packages, notebooks, outputs — lives in the container for the lifetime of the rental and is gone when it expires. Before Expire at, back up the folders you care about to Grafilab storage and download the archive.