

Account
Team & Permissions
By the end of this page a colleague can work inside your Grafilab account — deploying, calling models or topping up — with only the permissions you granted.
You stay the owner. A member signs in with their own credentials, then switches into your account to act on your wallet, your instances and your API keys. Nothing moves between accounts: their own account is untouched, and everything they spend or create while acting as you belongs to you.
Prerequisites
Section titled “Prerequisites”- Your own account, or one where you hold Admin (All) — the Team tab is admin-only.
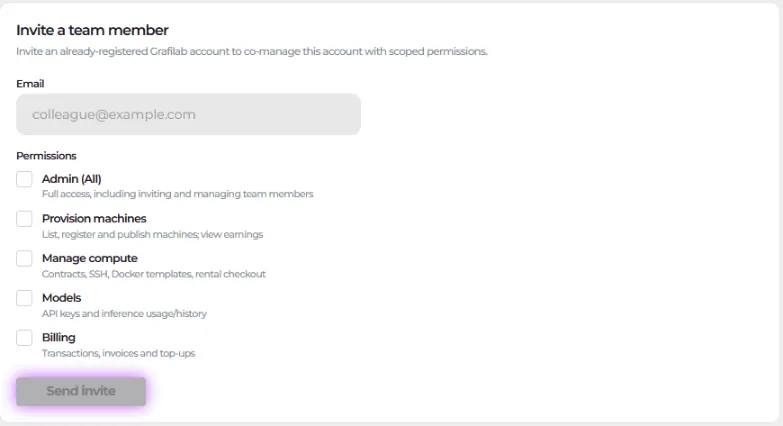
- The colleague’s Grafilab account email. The invite form is explicit: “Invite an already-registered Grafilab account to co-manage this account with scoped permissions.” They sign up in their own name first.
- A decision about which permissions they need, from the table below.
Permissions
Section titled “Permissions”Permissions are checkboxes, not roles, and you pick any combination.
| Permission | Helper text | What it opens |
|---|---|---|
| Admin (All) | Full access, including inviting and managing team members | Everything below, plus this Team tab. |
| Provision machines | List, register and publish machines; view earnings | — |
| Manage compute | Contracts, SSH, Docker templates, rental checkout | Compute, My Instance and Docker Templates. |
| Models | API keys and inference usage/history | Playground, API keys and inference usage. |
| Billing | Transactions, invoices and top-ups | Billing, and the Buy Credit button in the header. |
A member with none of these sees No permissions against their name and lands on Home with an otherwise empty sidebar. Opening a URL they lack the permission for redirects them to Home too, so grant Manage compute before asking someone to deploy, and Billing before asking them to top up.
Invite a member
Section titled “Invite a member”-
Go to My Settings → the Team tab, and open Invite a team member.
-
In Email, type the address on their Grafilab account — the field is prompted with
[email protected]. -
Tick the Permissions they need, using the table above.
-
Choose Send invite. A toast reads “Invitation sent.” and the members table gains a row marked Pending, “Invited 8 Sept 2026”.
Accept an invitation
Section titled “Accept an invitation”-
Open the invitation link, which points at
/team-invite?token=…. The page reads “alice invited you to co-manage their Grafilab account.” above the Permissions you were granted. -
Choose Accept invitation, or Decline to reject it.
-
The confirmation reads “You now have access to alice. You can switch between accounts anytime from the account picker.” Choose Go to dashboard.
Switch between accounts
Section titled “Switch between accounts”The account picker sits in the console header. It shows Signed in as with your own account, Acting as when you are inside somebody else’s, and Switch account to move between them.

While you are acting as another account, a banner stays on screen with Switch back to my account. The sidebar shows only the entries your permissions allow, Settings shows only the Team tab, and a bookmarked detail URL from a different account bounces back to its list page. Some owner-only areas stay hidden regardless.
Edit or remove a member
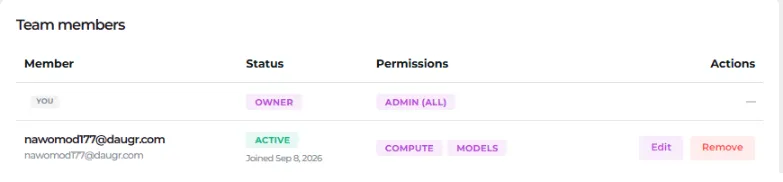
Section titled “Edit or remove a member”The Team members table lists Member / Status / Permissions / Actions, with badges for You, Owner, and Active or Pending. Before your first invite it reads “No other members yet. Invite someone above.”
-
On the member’s row, choose Edit. Change the boxes in Edit permissions and Save — a toast reads “Permissions updated.” The change applies the next time they load a page.
-
To end access, choose Remove. The Remove member dialog warns “Remove [email protected] from this account? Their access is revoked immediately.”
-
Decide about their keys. Tick Also revoke the API keys this member created to kill them along with the membership, then confirm. A toast reads “Member removed.”